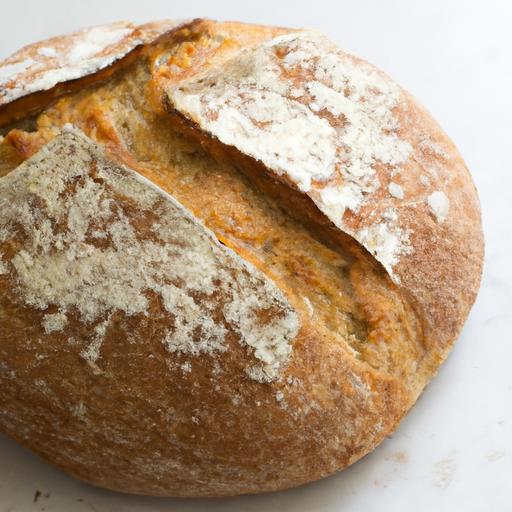
There’s something undeniably magical about pulling a golden, crusty loaf of sourdough from a blazing-hot Dutch oven-steam swirling, crust crackling, and aroma filling the kitchen. Yet, behind every perfect loaf lies more than just a skilled baker’s hands; it’s also about choosing the right vessel to nurture the dough’s transformation. In the world of artisanal bread baking, Dutch ovens have become indispensable tools, creating the ideal habitat for crust growth and even heat distribution. This article explores how to craft the perfect loaf by selecting the best Dutch oven for sourdough, balancing material, size, and design to bring your baking to it’s fullest potential.
Choosing the Ideal Dutch Oven Material for Artisan Sourdough
Crafting the Perfect Loaf with a Dutch oven begins by understanding how material impacts baking performance. Whether you are a seasoned baker or just embracing the sourdough journey, selecting the right Dutch oven material is crucial to achieving that elusive combination of a crunchy, blistered crust and an airy, tender crumb.
traditional cast iron Dutch ovens, revered for their dense, heavy walls, excel at heat retention and gradual, even heat distribution. This means your loaf will bake evenly, reducing hot spots that can cause uneven rising or burning.the thick cast iron lid traps steam effectively, which is vital for developing the characteristic glossy crust of artisan sourdough.Enameled cast iron, on the other hand, provides similar heat properties but offers a smoother, non-reactive surface that’s easier to clean and maintain – a great choice if you want functionality with less upkeep.
Aluminum or stainless steel Dutch ovens heat up faster but usually lack the mass to hold steady temperatures as long. while they may offer lighter weight and portability, this can lead to fluctuations during the bake, affecting the crumb structure especially in long fermentation sourdough recipes.For those seeking consistent results and classic aesthetics, a heavy enameled cast iron Dutch oven remains the gold standard.
Understanding Heat Retention and Distribution in Dutch Ovens
Achieving professional-quality artisan sourdough requires a Dutch oven that can sustain high, steady temperatures typically between 450°F and 500°F without sudden drops. Heat retention is primarily influenced by the material’s thickness and density. Cast iron’s superior thermal mass holds heat longer, while the lid’s snug fit seals in moisture, creating a mini steam chamber that allows the dough’s surface to stay hydrated before forming a crust.
Walls that distribute heat uniformly prevent overly browned spots, while steady heat encourages the perfect oven spring, where your loaf doubles in volume inside the oven, creating a lovely open crumb and desirable crust separation.
Top Dutch Oven Picks for Consistent Crust and Crumb
- Le Creuset Enameled Cast Iron Dutch Oven: Legendary for its thick walls, vibrant colors, and excellent heat retention; ideal for both beginners and pros.
- Lodge Cast Iron Dutch Oven: Budget-kind yet durable, Lodge’s classic is pre-seasoned and provides great thermal performance, perfect for rustic loaf baking.
- Dutch Oven with a Matte Enamel Interior: Prevents sticking and minimizes reactive issues with acidic doughs while maintaining even baking heat.
- Braising Pan Style Dutch Ovens: Wider surface area for larger loaves or batards; look for enameled surfaces and heavy construction.
Maintenance Tips to Keep Your Dutch Oven Baking Perfect
Proper care extends the life and performance of your dutch oven.For bare cast iron, regular seasoning with flaxseed or vegetable oil creates a natural non-stick surface and prevents rusting. Avoid harsh detergents; instead, clean with hot water and a stiff brush. Enameled versions require gentler care: soak and hand wash only,avoiding metal scrubbers to preserve the glaze.
After each use, dry your Dutch oven thoroughly and store it with the lid slightly ajar to prevent moisture buildup. Periodically inspect the sealing edge to ensure no warping, which could diminish steam retention. With attentive maintenance, your investment will yield perfect artisan sourdough loaves for many years to come.
Prep and Cook Time
Readiness: 24 hours (including fermentation and proofing)
Active Cook Time: 40 minutes
Yield
One 900g loaf (about 8 servings)
Difficulty Level
Medium – requires attention to fermentation times and dough handling
Ingredients
- 500g bread flour, sifted
- 350g water, lukewarm (about 75°F)
- 100g active sourdough starter (fed 4-6 hours before use)
- 10g sea salt
- Additional flour for dusting and shaping
Instructions
- Mix the dough: In a large bowl, combine the bread flour and water. Stir gently until no dry flour remains and the dough is shaggy. Cover and let rest for 1 hour (autolyse).
- Add starter and salt: Incorporate the active sourdough starter and salt into the autolysed dough. Mix thoroughly by hand or with a dough scraper until fully combined.
- Bulk fermentation: Cover and let the dough ferment at room temperature (72°F) for 4 to 6 hours. Perform a series of four stretch and folds every 30 minutes during the first 2 hours to develop gluten.
- shape the loaf: Lightly flour your surface and gently turn the dough out. Pre-shape into a round and let it rest for 20 minutes. Then,perform a final shaping into a tight boule,using a bench scraper to create surface tension.
- Proof the dough: Place the shaped dough seam-side up in a well-floured banneton basket or bowl lined with a tea towel. cover and refrigerate overnight (12-16 hours) for cold fermentation.
- Preheat the Dutch oven: Remove dough from the fridge 30 minutes before baking. Meanwhile, place your Dutch oven with lid in the oven and preheat to 475°F for at least 45 minutes.
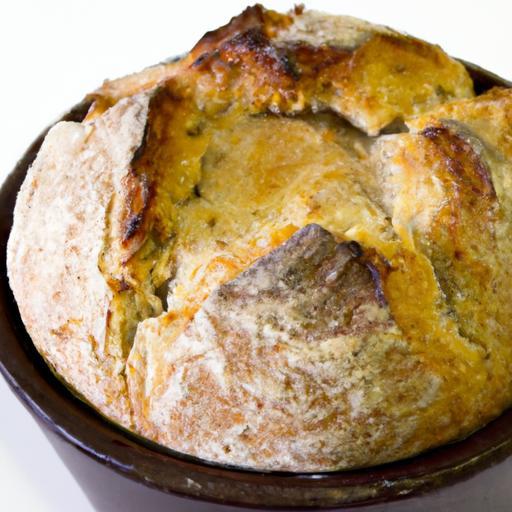
- Score and bake: Carefully remove the hot Dutch oven from the oven. Gently invert the dough onto parchment paper, score the top with a sharp blade, and transfer it into the Dutch oven. Cover with the lid and place back into the oven.
- Bake covered: Bake for 20 minutes covered to trap steam and encourage crust development.
- finish uncovered: Remove the lid and bake for an additional 20 minutes or until the crust turns deep golden brown and crackly.
- Cool: Remove the loaf from the Dutch oven and let cool on a wire rack for at least 1 hour before slicing to set the crumb.
Chef’s Notes and Tips for Success
- Starter strength: Ensure your sourdough starter is active and bubbly for the best rise and flavor development.
- Hydration adjustments: Adjust water slightly based on flour absorption and humidity-higher hydration doughs yield more open crumb.
- Steam alternative: If you don’t have a Dutch oven, try baking on a baking stone with a pan of boiling water to create steam.
- Make-ahead: Dough can be shaped and proofed in the fridge for up to 24 hours-just allow longer room temperature resting before baking.
- Crust variations: Remove the lid earlier for a crunchier crust or use the lid longer for a softer but still blistered crust.
serving Suggestions
Present your loaf sliced thick, with a smear of cultured butter or drizzled extra virgin olive oil. Pair beautifully with homemade herb-infused jams, a rustic cheese board, or bowl of hearty soup. Garnish the serving platter with fresh rosemary or thyme sprigs for a visual nod to the earthiness within.

| Nutrient | Per Serving (1 slice) |
|---|---|
| Calories | 150 |
| Protein | 5g |
| Carbohydrates | 30g |
| Fat | 1g |
For more tips on artisan baking,explore our detailed guide on Sourdough Starter maintenance. Learn about the science of fermentation from King Arthur Baking’s expert resources.
Q&A
Q&A: crafting the perfect Loaf – Best Dutch Ovens for Sourdough
Q: Why is a Dutch oven ideal for baking sourdough bread?
A: dutch ovens create a mini steam oven environment by trapping moisture released from the dough as it bakes. This steam keeps the crust soft in the early stages, allowing the bread to expand fully before forming a crisp, golden exterior-essential for that signature artisan sourdough loaf.
Q: What features should I look for in a Dutch oven when baking sourdough?
A: Size and material matter most. A 5-7 quart capacity fits most standard sourdough loaves. Heavy cast iron or enameled cast iron distributes heat evenly and retains it well. A tight-fitting lid is crucial to trap steam. Additionally,consider the handle design for easy lid removal during baking.
Q: Is enameled cast iron better than traditional bare cast iron for sourdough?
A: Both have their merits. enameled cast iron offers easy cleanup and doesn’t require seasoning, while bare cast iron develops a natural non-stick surface over time and can handle extreme temperatures. For sourdough bakers seeking convenience, enameled pots are a popular choice. traditional cast iron may appeal to those who enjoy maintaining their cookware.
Q: Can I use a regular pot or baking dish instead of a Dutch oven?
A: While possible, regular pots or baking dishes usually lack the tight seal and heat retention that Dutch ovens provide. This often results in less steam around the dough,leading to a denser crust and uneven bake. The Dutch oven’s ability to mimic a professional steam-injected oven makes it hard to replicate.
Q: How hot should I preheat my Dutch oven before baking sourdough?
A: Preheat your Dutch oven along with your oven to around 450°F (230°C). This ensures the pot is hot enough to create immediate steam and encourage oven spring, giving your loaf a lift and a beautiful crust.
Q: Are there any Dutch ovens specifically recommended for sourdough baking?
A: Several brands consistently impress sourdough bakers. Le Creuset’s enameled cast iron remains a top choice for durability and heat retention. Lodge offers high-quality, affordable bare cast iron options. Staub is praised for its excellent lids that trap moisture efficiently. Ultimately, the best Dutch oven aligns with your budget and baking preferences.
Q: How do I care for my Dutch oven to keep it baking-ready?
A: For enameled Dutch ovens, avoid metal utensils and abrasive cleaners to maintain the finish. Hand washing is often recommended. Bare cast iron requires seasoning with oil to keep it non-stick and rust-free. Store your pot dry and, if possible, with the lid slightly ajar to prevent moisture buildup.
Q: Any tips for beginners using a Dutch oven for the first time?
A: Handle with care-both the pot and lid get very hot. Use thick oven mitts when removing the lid during baking to release steam safely. Also, consider baking on parchment paper to prevent sticking. Don’t be discouraged by initial attempts; mastering sourdough with a Dutch oven is a rewarding journey.
This Q&A brings together practical insights and creative inspiration for bakers eager to harness the magic of Dutch ovens in their sourdough adventures. Whether you’re experimenting for the first time or refining your signature loaf, choosing the right Dutch oven makes all the difference.
Key Takeaways
Whether you’re a seasoned sourdough savant or just embarking on your bread-baking journey, choosing the right Dutch oven can transform your loaf from good to unforgettable. The perfect vessel not only locks in moisture and creates that coveted crust but also becomes a trusty companion in the evolving art of sourdough. As you explore the options and find the Dutch oven that suits your kitchen and style, remember: every loaf is a new possibility to craft something truly delicious. So preheat, proof, and pour your passion into the dough-your perfect sourdough adventure awaits.