Pâte à choux, a delicate French pastry dough, forms the foundation of some of the most beloved desserts and savory treats around the world. Though its seemingly simple ingredients-flour, water, butter, and eggs-may appear straightforward, mastering the technique behind this versatile dough can be a subtle art. Whether you aspire to craft airy éclairs, delicate cream puffs, or golden gougères, understanding the nuances of pâte à choux is essential for achieving that perfect balance of lightness and structure.This beginner’s guide will walk you through the essentials, demystifying each step and offering practical tips to help you unlock the secrets of pâte à choux and elevate your baking to new heights.
Mastering pâte à choux dough unlocks the door to creating some of the most elegant and airy pastries in French baking. Whether you’re aiming for dreamy éclairs, delicate cream puffs, or golden gougères, understanding the science behind pâte à choux will elevate your skills and promise consistent results. This light yet sturdy dough relies on a perfect balance of steam and gluten growth, transforming a simple mixture of water, butter, flour, and eggs into a beautifully puffed masterpiece.
Prep and Cook Time
- Readiness: 15 minutes
- Cooking: 30 minutes
- Total: 45 minutes
Yield
Makes approximately 12 medium-sized pastries
Difficulty Level
Medium – Beginner bakers can achieve success with attentive technique
Ingredients
- 1 cup whole milk (or water for a lighter pastry)
- 8 tablespoons unsalted butter (cut into pieces)
- 1/2 teaspoon fine sea salt
- 1 cup all-purpose flour,sifted
- 4 large eggs,at room temperature
- optional: 1 teaspoon sugar (for slightly sweet dough)
understanding the Science Behind Pâte à Choux Dough
The magic of pâte à choux lies in its unique ability to puff without any leavening agents like yeast or baking powder. As you heat the liquid, butter, and salt in a saucepan, the fat melts and infuses moisture into the mixture. Once you whisk in the flour,the dough forms a dense ball where gluten strands start to develop.Cooking this mixture further drives out excess moisture, ensuring a stable dough that can trap steam during baking.
When eggs are vigorously beaten in, their proteins incorporate air and help the dough become elastic. During baking, the water inside turns to steam, forcing the dough to rise dramatically, creating hollow pastries with crisp exteriors and tender, airy interiors. Mastering this balance lets you control texture and rise every time you bake.
Essential Tools and Ingredients for Consistent results
- Heavy-bottomed saucepan: Guarantees even heat distribution to avoid scorching the dough
- Wooden spoon or heatproof spatula: Perfect for stirring dense dough
- Electric mixer with paddle attachment: Helps to thoroughly incorporate eggs for smooth texture
- Piping bag with round or star tip: Enables uniform shaping of your dough
- Fresh, room temperature eggs: Vital for emulsification and dough consistency
- High-quality flour and butter: Contribute to structure and flavor
step by Step Techniques for Perfectly Puffed Pastries
- combine Milk, Butter, Salt, and Sugar: In your saucepan, bring the milk, butter, salt, and sugar to a rolling boil over medium heat.
- Add Flour All at Once: Remove from heat and quickly stir in all the flour. Return the pan to medium heat and stir vigorously for about 1-2 minutes.This step cooks off excess moisture and helps the dough form a smooth ball that pulls away from the sides.
- Cool the Dough Slightly: Transfer the dough to a mixing bowl and let it cool for about 5 minutes to prevent scrambling the eggs in the next stage.
- Incorporate Eggs Gradually: Using an electric mixer or by hand, beat in eggs one at a time. Add the next egg only when the previous one is fully incorporated. The dough will change from heavy to smooth and glossy, dropping slowly from your spoon like thick ribbon.
- Pipe Onto Baking Sheet: Fit a piping bag with your chosen tip and pipe rounds or shapes onto parchment-lined trays. Leave enough space to allow for puffing and spreading.
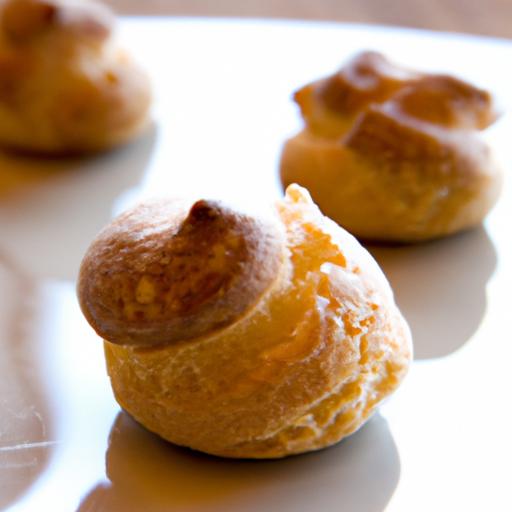
- Bake Immediately: Preheat your oven to 400°F (200°C). Bake the pastries for 10 minutes at high heat, then reduce to 350°F (175°C) and bake another 15-20 minutes until golden and hollow sounding when tapped.
- Avoid Opening Oven Door: Resist opening the oven during baking; sudden temperature changes can cause deflation.
Troubleshooting Common Issues and Expert tips for Success
- Dough Too Runny: If your dough spreads on the baking tray, you probably added the eggs too quickly or the dough wasn’t cooked enough during the flour stage. Return dough to heat and stir longer before adding more eggs.
- Pastries Do Not Puff: Underbaking, expired flour, or eggs not fully incorporated can cause flat pastries. Ensure your oven is fully preheated and eggs are room temperature.
- Cracked or Lopsided Pastries: Pipe consistent shapes and avoid overcrowding. Adjust oven rack to middle position for even airflow.
- Make Ahead: Choux dough can be piped onto trays and frozen raw for up to one month. Bake directly from frozen, adding a few extra minutes to baking time.
Tips for Success
- Use a thermometer to check your oven temperature; manny problems stem from inconsistent heat.
- Experiment with substituting some water for milk for richer flavor and browner crust.
- For savory variations, fold grated cheese directly into the dough before piping for irresistible gougères.
- Always cool the dough slightly before adding eggs to avoid coagulation.
Serving Suggestions
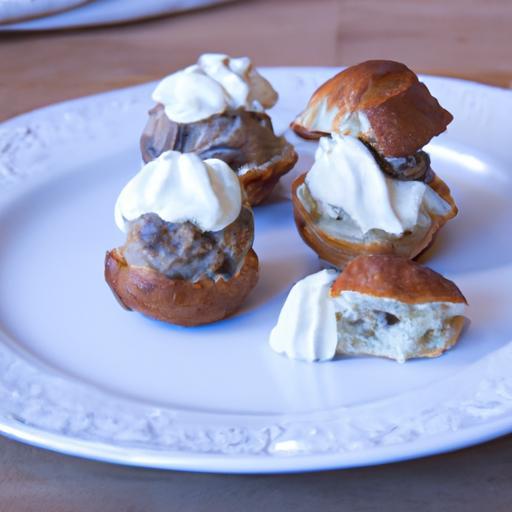
These versatile pastries shine whether sweet or savory. For a classic dessert, split cream puffs and fill with vanilla pastry cream or whipped chantilly cream. Dust with powdered sugar or drizzle with warm chocolate ganache for a stunning presentation.
For savory applications like gougères, serve warm with a sprinkling of fresh herbs or alongside a crisp salad. layer éclairs with coffee-infused cream or fruit curds for a refined twist. Garnish with edible petals or a light glaze to elevate your creations to cafe-worthy standards.

| Nutrient | Per Serving (1 pastry) |
|---|---|
| Calories | 130 kcal |
| Protein | 4 g |
| Carbohydrates | 15 g |
| Fat | 6 g |
For further inspiration on using pâte à choux and versatile French pastry techniques, explore our extensive guide to French pastries. Learn more about ingredient science from trusted sources like Cook’s Illustrated for in-depth exploration of pâte à choux dough chemistry.
Q&A
Q&A: Mastering Pâte à Choux – A Beginner’s Guide to Perfection
Q1: What exactly is pâte à choux,and why is it special?
A1: Pâte à choux,or choux pastry,is a unique dough that sets itself apart by relying on steam rather than chemical leaveners or yeast for its rise. This delicate batter transforms into airy, hollow shells perfect for sweet and savory creations like éclairs, cream puffs, and gougères. Its versatility and magical puff make it a favorite in classical and modern baking.
Q2: Why does pâte à choux need to be cooked twice during preparation?
A2: The dough undergoes two crucial heat stages: first, on the stovetop to cook the flour and form a smooth paste; second, in the oven to bake and expand the pastry. Cooking the flour initially at the stovetop removes its raw taste and creates a stable structure, enabling the dough to trap steam effectively, which is essential for the characteristic puff.
Q3: What are the common mistakes beginners make with pâte à choux?
A3: Two common pitfalls are adding eggs too quickly or not enough, and over- or under-mixing the dough. Eggs must be incorporated gradually to reach the right batter consistency-smooth and pipeable but not runny. Also, baking at the wrong temperature or opening the oven door too soon can cause the pastry to deflate.Patience and precision are key.
Q4: how can one tell when pâte à choux dough has the perfect consistency?
A4: Perfect pâte à choux should be shiny, thick enough to hold its shape when piped, yet soft enough to pipe smoothly. When you lift the spatula, the dough should form a “V” shape that gently folds over.If it’s too stiff, add a little beaten egg; if too loose, add a touch more flour.
Q5: Can pâte à choux be made ahead of time, or is it best fresh?
A5: While it’s always best to bake pâte à choux fresh for maximum puff and crispness, the dough can be made ahead and refrigerated for up to a day. Just bring it back to room temperature before piping.Baked pastries can be stored, but they’re best enjoyed the same day to preserve their delicate texture.
Q6: What role does oven temperature play in achieving perfect pâte à choux?
A6: Oven temperature is crucial.starting with a hot oven (around 400°F/200°C) creates the initial burst of steam necessary for rising. After 10-15 minutes, lowering the temperature helps the pastry dry out and develop a crisp shell without burning. A steady oven and no door peeking ensure optimal rise.
Q7: How can beginners experiment beyond classic cream puffs?
A7: Once comfortable, try savory versions like gougères by adding cheese to the dough, or fill éclairs with inventive creams and glazes-think matcha, coffee, or fruit curds. Pâte à choux invites creativity, so don’t hesitate to explore sweet, savory, or hybrid combinations to your heart’s content.
Mastering pâte à choux is a rewarding journey that blends technique with imagination. With practice, each delicate puff becomes a testament to your baking finesse.
Future Outlook
As you close the chapter on your first journey with pâte à choux, remember that mastery is less about perfection and more about persistence. Each batch brings new nuances, each puff a fresh lesson, guiding you closer to that ideal balance of crisp exterior and airy interior. With patience and practice, what once seemed elusive will become second nature-transforming simple ingredients into delightful pastries that carry both tradition and your personal touch. So, take your newfound skills, experiment boldly, and let your kitchen become a playground where pâte à choux unveils its true, appetizing potential.