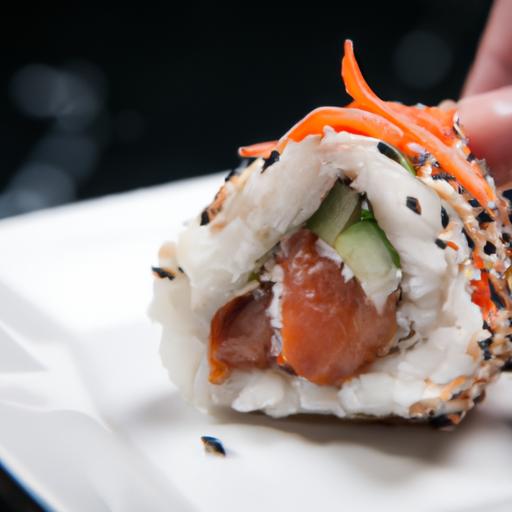
In teh vibrant world of sushi, few creations captivate the eye and palate quite like the uramaki – the inside-out roll that turns tradition on its head. With rice embracing the seaweed instead of the other way around, uramaki invites both novices and seasoned sushi enthusiasts to explore a fresh approach to rolling. Whether you’re aiming to recreate the classic California roll or experiment with inventive fillings, mastering uramaki opens the door to endless culinary creativity.This step-by-step guide will demystify the art of the inside-out sushi roll, equipping you with the techniques and tips to craft lovely, flavorful uramaki right in your own kitchen.
Understanding the Essential Ingredients for Perfect Uramaki
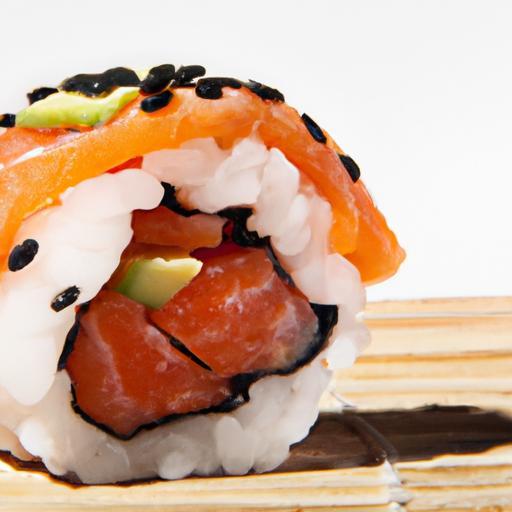
Mastering Uramaki means embracing the delicate balance between simplicity and precision. this beloved inside-out sushi roll elevates traditional sushi by positioning the seasoned rice on the exterior and nori sheet hidden inside, creating a visually stunning and flavorful bite. the foundation lies in using premium, thoughtfully selected ingredients that harmonize with texture and flavor, allowing your uramaki to shine.
Sushi rice is the heart of every uramaki roll. Using the right type of short-grain Japanese rice is crucial for achieving the perfect sticky texture.The rice is carefully cooked and seasoned with a precise blend of rice vinegar, sugar, and salt, which imbues it with subtle sweetness and tanginess.
Equally critically important is the choice of nori. Opt for fresh, dark green sheets with a slight sheen and a crisp texture that will hold fillings securely without tearing. For inside-out rolls,thinner nori is often preferred to prevent overwhelming the delicate balance between rice and filling.
High-quality, fresh ingredients paired with optimal preparation transform uramaki into an authentic and delightful experience.
Preparing Sushi Rice and Selecting the Right Nori for Inside-Out Rolls
Start by rinsing 2 cups Japanese short-grain rice under cold water until the water runs clear,ensuring excess starch is removed. Cook it using a rice cooker or stovetop method for best consistency. Once cooked, gently fold in the sushi vinegar mixture-made from 1/4 cup rice vinegar, 2 tbsp sugar, and 1 tsp salt-into the warm rice with a wooden spatula. Allow the rice to cool to room temperature covered by a damp cloth to retain moisture.
For the nori, choose thinner sheets labeled “shin-nori” if available, which lend themselves best to inside-out rolls, keeping the roll tender yet sturdy. Before rolling, place the nori shiny side down on a bamboo rolling mat lined with plastic wrap to prevent sticking.
Mastering the Art of Rolling: Techniques for a Clean and Tight Uramaki
Rolling perfect uramaki takes gentle yet firm technique. Begin by spreading the sushi rice evenly over the nori to about 1/4 inch thickness, leaving a small edge at the top for sealing. Use wet fingers or a damp spoon to handle the rice; this prevents sticking and creates a smooth rice surface.
Next, flip the rice-covered nori so the nori side faces up. arrange your selected fillings-such as fresh fish, crisp vegetables, or creamy avocado-in a horizontal line across the center. Lightly lift the edge nearest you with the bamboo mat and roll forward gently but firmly. Apply even pressure with the mat while rolling to ensure the roll stays tight and maintains a clean shape.
After the roll is sealed,use a sharp,wet knife to slice into equal portions. Clean the blade between cuts to prevent the rice from sticking and losing form.
Creative Filling combinations and Presentation Tips to Elevate Your Sushi
While traditional fillings like kani (imitation crab), cucumber, and avocado remain classics, don’t hesitate to experiment. Consider pairing seared tuna with spicy mayo and tempura flakes for added crunch,or smoked salmon with cream cheese and scallions for a subtle twist.For a vegetarian option, roasted sweet potato and pickled radish provide beatiful flavor contrasts and vibrant color.
Presentation enhances the appeal-garnish your uramaki with a sprinkle of toasted sesame seeds, thinly sliced scallions, or vibrant tobiko (flying fish roe). Arrange rolls on a dark slate or bamboo sushi board to highlight the bright rice and colorful fillings. Accompany with pickled ginger, wasabi, and soy sauce in elegant dipping dishes.
Prep and Cook Time
- Preparation Time: 30 minutes
- Cook Time: 20 minutes
- Total Time: 50 minutes
Yield
4 servings (approximately 24 pieces)
Difficulty level
Medium
Ingredients
- 2 cups Japanese short-grain sushi rice
- 2 1/4 cups water (for cooking rice)
- 1/4 cup rice vinegar
- 2 tbsp granulated sugar
- 1 tsp fine sea salt
- 5 sheets nori (thin, quality type)
- 1/2 lb fresh sushi-grade tuna or salmon, thinly sliced
- 1 medium cucumber, julienned
- 1 ripe avocado, thinly sliced
- 2 tbsp toasted sesame seeds
- Pickled ginger, wasabi, and soy sauce for serving
Instructions
- Rinse the rice under cold water until it runs clear. Drain thoroughly.
- Cook rice with 2 1/4 cups water in a rice cooker or pot until tender and water is absorbed.
- While rice cooks, combine vinegar, sugar, and salt in a small saucepan. heat gently until sugar dissolves; cool to room temperature.
- Transfer cooked rice to a wooden or plastic bowl. Pour vinegar mixture evenly over rice and fold gently with a wooden paddle to season without smashing grains. Cover with damp cloth; cool to room temperature.
- Place a sheet of plastic wrap over your bamboo mat, then lay a nori sheet shiny side down across the mat.
- Wet your hands to avoid sticking and spread a thin, even layer of sushi rice over the nori, covering completely but leaving 1/2 inch at the top edge.
- Sprinkle toasted sesame seeds evenly over the rice surface.
- Carefully flip the sheet over so the nori faces up and rice is on the bottom.
- Place a thin line of tuna, cucumber, and avocado horizontally across the center of the nori.
- Starting at the edge closest to you, roll the bamboo mat forward slowly, applying light pressure to form a firm roll.
- Seal the edge by moistening the bare nori strip with water for adhesion.
- Using a sharp,wet knife,slice the roll into 6 equal pieces,cleaning the blade between cuts to maintain clean edges.
- Repeat with remaining nori sheets and fillings.
- arrange cut rolls on a serving platter with pickled ginger, wasabi, and soy sauce on the side.
Tips for Success
- Use a fan or gently blow on the rice as you fold in the vinegar mixture to help it cool quickly and develop a shiny finish.
- If your rice feels dry or hard to handle, lightly mist your hands with water each time before spreading.
- When slicing rolls, keeping the knife warm under hot water and wiping it dry between cuts helps prevent sticking.
- Experiment with fillings like tempura shrimp or spicy mayo blends to customize flavor profiles.
- Make the sushi rice up to a day ahead and cover tightly; fresh is best, but slightly chilled rice still works well.
Serving Suggestions
For a visually appealing platter, alternate uramaki rolls with different fillings and garnish with microgreens or edible flowers for a refined aesthetic. Serve alongside chilled sake, green tea, or a crisp white wine for a complete dining experience.
| Nutrient | Per Serving (6 pieces) |
|---|---|
| Calories | 320 kcal |
| Protein | 18 g |
| Carbohydrates | 40 g |
| Fat | 7 g |
Learn more about perfect sushi rice preparation at Japanese Cooking 101.
Check out our Comprehensive Sushi Basics Guide for more tips on mastering rice and rolling techniques.

Q&A
Q&A: Mastering Uramaki – Your Step-by-Step Inside-Out Sushi Roll Guide
Q1: What exactly is Uramaki, and how does it differ from other sushi rolls?
A: Uramaki, often called the “inside-out” roll, flips traditional maki sushi on its head by placing the rice on the outside and the nori seaweed inside, wrapping around the fillings. This technique not only changes the texture but also allows for creative toppings like sesame seeds or tobiko on the rice, enhancing both flavor and appearance.
Q2: Why should I try making Uramaki at home?
A: Making uramaki at home is a rewarding culinary adventure. It offers a chance to experiment with unique fillings and coatings, develop knife and rolling skills, and enjoy fresh sushi customized exactly to your taste. Plus, mastering the inside-out technique elevates your sushi-making prowess beyond basic rolls.
Q3: What essential ingredients and tools do I need to start?
A: For a classic uramaki, you’ll need sushi rice (properly seasoned with rice vinegar, sugar, and salt), nori sheets, fresh fillings such as cucumber, avocado, and your choice of fish or tofu, and coatings like sesame seeds.Tools include a bamboo rolling mat (makisu),a sharp knife,and a bowl of water to keep your hands wet and prevent sticking.Q4: Can you break down the Uramaki rolling process?
A: Certainly!
- Spread a thin, even layer of sushi rice over the bamboo mat covered with plastic wrap – rice side down.
- Carefully flip the rice-covered mat so rice faces down on the plastic wrap, exposing the nori underneath.
- Place your fillings in a line near one edge of the nori.
- Use the mat to roll the sushi away from you,tucking the fillings inside the nori layer.
- Once rolled, gently squeeze to shape the roll, then coat the outer rice layer with your chosen toppings.
- Slice the roll into bite-sized pieces with a wet, sharp knife.
Q5: What are common challenges beginners face with uramaki,and how can these be overcome?
A: Beginners may struggle with rice sticking to hands or uneven rolling. Keep your hands damp to manage stickiness and use a plastic wrap under the rice layer for smooth rolling. Also, don’t rush; gentle but firm pressure ensures a tight roll without squishing the fillings.
Q6: How can I customize Uramaki to reflect different flavors or dietary needs?
A: Uramaki is incredibly versatile! Swap fish for grilled vegetables or tempura tofu for vegetarian options. Add spicy mayo or soy glaze for zing, or roll in crushed nuts for texture. Experimenting with seasonal ingredients can make your uramaki uniquely your own.
Q7: What’s the best way to serve and enjoy freshly made Uramaki?
A: Serve promptly with classic accompaniments like soy sauce, pickled ginger, and wasabi. As uramaki showcases fresh ingredients, it tastes best when eaten soon after preparation, preserving its texture and flavor balance.
Mastering uramaki opens a door to sushi artistry-where tradition meets creative flair wrapped in every bite. Happy rolling!
In Retrospect
Mastering the art of Uramaki opens a appetizing doorway into the world of sushi that’s as rewarding as it is indeed tasty. with each carefully crafted roll, you’re not just creating food-you’re embracing a timeless tradition with a modern twist. By following these step-by-step instructions, you’ll gain the confidence to experiment with flavors, textures, and presentations that delight both the eye and the palate. Whether you’re rolling for friends, family, or savoring a quiet meal at home, your inside-out sushi creations will surely impress.So grab your bamboo mat, gather your freshest ingredients, and dive into the satisfying craft of Uramaki-because every roll is a small masterpiece waiting to be made.